Why Are My Pictures Blurry?
Last Updated on June 25, 2025

Wondering why your photos are blurry? Learn the most common causes—like motion blur, focus issues, or lighting problems—and discover simple tips to fix blurry images for good.
You planned the perfect shoot, picked the location, styled the outfits, and nailed the poses. Everything went well until you looked at the pictures and found that many of them were blurry. Frustrating, right? It happens even to professionals.
In this article, we’ll cover the most common causes of blurry shots and how to fix them, so you can keep your images crisp and clear.
Why Are My Photos Blurry? (And Why It Keeps Happening)
Sharpness is what gives a photo its detailed look, allowing textures, edges, and fine details to stand out clearly. It depends on a mix of focus, stability, and lighting. Seems quite simple, but you keep asking yourself: "Why are my pictures blurry?"
Blurry photos can be a real headache, especially when you're trying to capture something important. Often, the problem stems from movement, poor focus, or inadequate lighting. Maybe your hands shake slightly, your subject moves too fast, or your camera struggles to lock onto the right point. A dirty lens or incorrect settings can also sabotage a good shot. The solution? Let's see it below.
The Most Common Reasons Your Pictures Are Blurry
All photographers, no matter how experienced, sometimes ask themselves: "Why are my pictures blurry? What are the reasons?" There are a few common mistakes that cause it to happen, and when you learn to notice them, fixing the concern will be easy.
1. Incorrect Shutter Speed
 Shutter speed is how long your camera’s sensor is exposed to light. If it stays open for too long, even slight shakes or motions can compromise the sharpness. For example, shooting handheld at 1 second? Expect blur. But with a fast shutter speed of 1/500 or 1/1000 of a second, you get a sharp shot.
How to Adjust Shutter Speed Based on Movement
Pick your shutter speed based on the situation. Go with a shutter speed at least equal to one over your lens’s focal length for good results.
Movement Type | Recommended Shutter Speed | Effect |
Fast-moving subjects (sports, wildlife, vehicles) | 1/1000 s or higher | Freezes motion, sharp details |
Moderate movement (walking, dancing) | 1/250 s to 1/500 s | Natural motion without excessive blur |
Slow-moving objects (landscapes, portraits) | 1/60 s to 1/200 s | Sharp images with minimal motion blur |
Creative motion blur (light trails, waterfalls) | 1/30 s or lower | Intentional blur for artistic effect |
Panning technique (tracking a moving subject) | 1/30 s to 1/125 s | Sharp subject with blurred background |
Another option is to switch to Shutter Priority Mode (S or Tv). It allows your camera to balance other settings automatically.
2. Poor Focus Technique
 A picture is blurry when your focus is wrong. Even if your other settings are solid, poor focus technique can cause this problem.
Autofocus vs Manual Focus: Which to Use?
Cameras usually have two ways: autofocus, where the camera does the job, and manual, where you do it by turning a ring on the lens. Autofocus is useful when things are moving, or you’re shooting quickly, but sometimes it picks the wrong subject or gets confused in low light. Manual focus requires a bit more effort, but it allows for extreme precision and control. It is ideal for close-ups or when you need complete control.
3. Shaky Hands or Camera Shake
 Sometimes, the photo is blurry because of unsteady shooting. Minimal vibrations may mess up your sharpness, especially when you have a slow shutter or are shooting through a telephoto lens. Various factors, including wind and environmental vibrations, can also cause your images to distort. So, what to do?
Using a Tripod or Stabilization to Prevent Blur
A sturdy tripod provides a stable base, eliminating hand movement and reducing the risk of camera shake and blur. Classic tripods have three legs and offer the most stability. Monopods have just one leg, so they’re lighter and easier to move around with, but they’re not as stable. Then there are small tabletop or flexible tripods that can attach to various surfaces. They are handy when you’re working in tight spaces or unusual spots.
Additionally, many modern cameras and lenses feature image stabilization (IS) or vibration reduction (VR) technology. But when using a tripod, we recommend turning off image stabilization, as it can sometimes introduce unintended motion.
4. Low Light Conditions and Long Exposure
 Whenever the light is low, your camera takes longer to capture the frame. In this case, the shutter stays open for a longer time, and that’s referred to as a long exposure. It’s tricky because just the slightest camera movement can cause the image to appear blurry. That’s the reason low-light pictures are often blurry unless the camera is stabilized.
To handle it, try to:
increase ISO (but be cautious of noise);
open the aperture;
use a tripod or image stabilization;
add artificial light if possible.
If your shot looks too dark, you can brighten a picture using built-in exposure or lighting adjustments in most editing tools.
5. Depth of Field Mistakes
 Depth of field (DOF) means the area in the frame where objects appear clear and sharp. If the aperture is too wide (small f-number) and the focus is set at the wrong distance, part of the subject may fall outside the DOF and appear blurry.
Depth of field (the in-focus part of your shot) changes based on three things:
your aperture (higher f-number = more in focus);
how far you are from your subject (more distance = more in focus);
your lens (wide lenses keep more in focus, zoomed-in ones less).
If you want everything sharp, use a smaller aperture (higher f-number), but remember that smaller apertures require more light or slower shutter speeds.
6. Wrong Autofocus Mode
 Another common problem, when the picture is blurry, is using the wrong autofocus mode. Especially in low light or if your background is plain, your camera might focus on something random, like a wall behind your subject or a tree in the front. Most cameras offer a few autofocus modes:
Single AF (AF-S/One-Shot) for still subjects;
Continuous AF (AF-C/AI Servo) for moving subjects;
Auto AF (AF-A/AI Focus) switches automatically (not always reliably).
The choice will depend on what you’re shooting and the conditions. Plus, you can modify the hues, contrast, and saturation in your image color editor.
7. Using the Wrong Aperture
 Aperture controls two things: how much light gets in, and how much of your shot looks sharp. When you shoot with a wide aperture, like f/1.8 or f/2.8, only a small slice of the scene is in focus. That’s great for portraits where you want the face sharp and everything else to be dreamy and soft.
With a narrow aperture, f/11 or f/16, more of the frame stays in focus. That’s perfect for landscapes or group photos. Just don’t go too far, because if the aperture gets too small, your image might get a bit softer from something called diffraction.
Our recommendations are as follows: for portraits, use a range of f/2.8–f/5.6, and for landscapes, select f/8–f/11.
8. ISO and Noise Issues
 ISO adjusts your camera’s ability to detect light. When it is too high, your shot can have noise, tiny grains, or speckles, compromising the clarity.
In bright conditions, such as outdoors during the day or in a well-lit room, ISO 100–400 is usually enough. In dimmer light, you might need ISO 800–1600, but test how much noise your camera adds at those levels.
In low light, such as indoors at night, you may need to increase the ISO setting to 3200 or higher. But expect more grain. Before cranking it that high, try other options first: open up the aperture or use a tripod with a slower shutter speed if possible.
9. Using Digital Zoom Instead of Optical Zoom
 To use optical zoom, the lens moves physically toward the subject, without compromising image quality. The digital is a portion of the image using software, typically resulting in blurry, pixelated photos. Of course, pixel zoom is quick and found on most smartphones or small cameras. But with optical zoom, your camera lets in more light, something that zoom-by-cropping often fails to achieve.
10. Dirty or Foggy Lenses
 A dirty or fogged-up lens can affect the quality of your photos. Even small smudges, dust, or fingerprints scatter the light. You might also get weird glare or ghost-like effects, especially if you're shooting in low light. Use lens wipes or proper cleaning tools, and don’t touch the glass with your fingers.
11. Movement in the Scene (Subject Blur)
If your subject is moving and your shutter speed is too slow, you will get motion blur. The longer the shutter stays open, the more noticeable the blur will be. To avoid this, use a faster shutter speed. For slower motion, 1/125 sec might work; for faster, 1/500 sec or quicker.
To keep a moving subject sharp, try using continuous autofocus (AF-C) — it adjusts focus as your subject moves.
12. Compression or Poor Image Quality Settings
 JPEG is the most common format for saving photos. It compresses the file to reduce its size, which means that some image details are lost in the process. If the quality setting is too low (below 60–70%), the photo may appear blocky or blurry, especially in smooth areas such as skies or skin.
To keep your photos looking sharp, aim for a higher quality setting — around 80–90% — or shoot in RAW or TIFF if you plan to edit the photo later. In the next chapter, we'll discuss how to unblur an image.
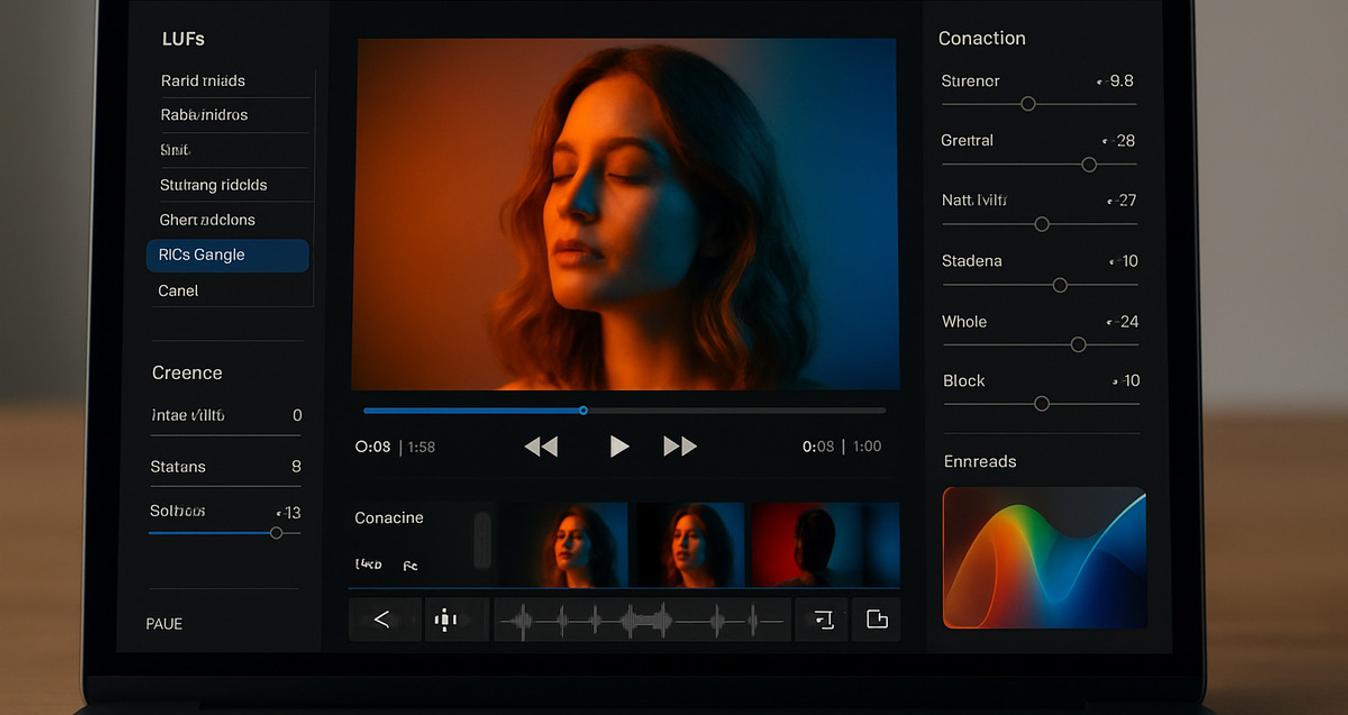
Fixing Blurry Photos with Luminar Neo
-5491.jpeg?q=85&w=840)

If you’ve got blurry photos, don’t delete them just yet — Luminar Neo might save them. It is the best picture editor, which uses AI to help fix blurry images. The app is easily accessible to both novice and experienced photographers. Besides, if you have many photos to correct, the editor handles batch processing with ease.
Strong AI features allow the tool to correct out-of-focus and blurred images caused by camera movement. SuperSharp AI examines the background, angle, and objects in the picture to determine where the blur occurred. Next, it gets sharper edges without adding fake-looking effects.
The feature offers three intensity options to suit the degree of blur:
low;
medium;
high.
Unlike other sharpening tools, SuperSharp AI removes blur only when needed, improving image quality.
Quick Workflow: Sharpening and Processing Images
Here's a brief step-by-step instruction to sharpen blurry images in Luminar Neo:
Open your photo in Luminar Neo.
Go to the "Edit" panel and select SuperSharp AI.
Pick your sharpness level — low, medium, or high.
Zoom in to check the results up close.
Adjust settings or mask specific areas you want to sharpen if needed.
Save your photo — and you’re done.
With just a few steps, everything in your photo will look clear again.
Say Goodbye to Blurry Pictures
 While fuzzy pictures can be frustrating, you can make sure they don’t happen often. If you take care of shutter speed, focus, camera stabilizer, and settings, your photograph will be sharp.
The more you practice photography, the better you become at it. Experience and the right gear will help your photographs be crisper, more precise, and more enjoyable to look at.