Long Exposure Night Photography
Last Updated on June 23, 2025

Discover the magic of long exposure night photography! Learn what it is, which gear to use, how to shoot light trails and starry skies, plus expert tips and settings for every scene.
Did you know that the world’s first photograph required an exposure time of nearly 8 hours? In 1826, French inventor Joseph Nicephore Niepce produced the first permanent photograph using heliography. Because he kept the camera open for hours, the sun moved across the sky, casting shadows from multiple angles. Today, we’d call it an ultra-long exposure, and it laid the foundation for modern photography techniques.
Learn about:
Long Exposure Night Photography
What is Long Exposure Night Photography?
Equipment for Night Long Exposure Photography
How to Do Long Exposure Photography at Night?
Long Exposure Photography Ideas
Tips for Better Nighttime Long Exposure Photography
Long Exposure Night Photography Settings for Different Scenarios
Start Capturing Beautiful Long Exposure Photos at Night
There’s another interesting fact: long exposure can make crowds of people seem invisible in photos. If people move during a multi-second exposure, they leave no sharp trace on the image. At the same time, still objects show clear lines and edges.
The last curious aspect is that long exposure allows you to "paint" with light. For example, car headlights turn into bright light trails, and the movement of stars across the night sky leaves behind stunning circular patterns on photos — things we can’t see with the naked eye.
What is Long Exposure Night Photography?

Long exposure is a photography technique where the camera’s shutter stays open longer than usual—instead of snapping a quick moment, it captures the scene over several seconds, minutes, or even hours. This results in motion appearing blurred or ghostly, while stationary objects stay sharp and clear.
For beginners, it’s common to ask: "Why does long exposure work best at night?" Because at night, there’s much less light than during the day, the camera can keep its shutter open longer without overexposing the image. This allows it to collect light from multiple sources, such as streetlamps, stars, and car headlights.
Equipment for Night Long Exposure Photography
Many people might think that we prepared another long and pricey list of gear. But have no fear, because you don't need to purchase every gadget. The stuff listed below may already be in your camera bag.
A camera with a sensor of 12 megapixels or higher. With bigger image sensors, you have more freedom to adjust your pictures. While both Full Frame and APS-C (crop) sensors produce excellent results, Full Frame cameras generally offer better image quality. Plus, your camera should have a Manual (M) or Aperture Priority (A) mode.
Lenses with larger apertures gather more light. So, investing in lenses from Sigma’s ART line or Canon’s L series can give you better sharpness.
A reliable and sturdy tripod prevents camera movement during long exposures. Choose between standard models, mini, or clamp tripods.
An ND filter slows down the shutter speed, producing brighter images without overexposure. Don’t need to use an ND filter when shooting in low light or at night.
Having a remote shutter helps avoid camera shake when you press the shutter.
Even with all the right gear for night shooting, you’ll also need fast editing software. If you're a user of Adobe products but want something new, consider comparing Luminar vs Lightroom. But we’ll get to that later.
Explore the Future of Noise Reduction with NoiselessAI
Try It in Luminar NeoHow to Do Long Exposure Photography at Night?
Taking pictures at night with long exposure gives you countless creative ideas. Want to find out how to do it?
Step 1: Plan Your Shoot in Advance
Make a list of all the requirements: camera, tripod, battery (with some spares), all the lenses, a remote shutter, and any filters you’re taking. Don’t forget basic things like a flashlight, warm clothes, and a headlamp with a red light to help protect your night vision.
When traveling a long distance, schedule your trip to allow time for preparation upon arrival. Also, before planning your long exposure night photography, check the weather forecast to avoid shooting during rain or windy conditions, which can damage your equipment or pose a risk to you.
Step 2: Choose the Right Location and Composition
Pick what you want your image to show — stars, light trails, fireworks, or something else. Following this, identify locations that fit your vision: if you are shooting stars, go to areas with minimal light pollution; if it’s city lights you want, check busy roads and buildings with a view from high places.
Consider your location’s safety and accessibility for night-long exposure photography, to prevent anything from distracting you while you're shooting. Follow the rule of thirds to lead the viewer’s eye through the photograph.
Step 3: Set Up Your Tripod and Frame the Shot
With long exposure photography at night, a stable tripod prevents camera shake from causing blur. Place your tripod on solid ground, checking it’s secure. Use the camera’s Live View or viewfinder to set up how you want your shot. Control if your horizon and the main subjects are arranged thoughtfully in frame.
Step 4: Improve Long Exposure Night Photography Settings
Begin by setting a low ISO, such as 100 or 200, to reduce noise. A good depth of field is reached by setting f/8 or f/11 on the aperture. The chosen shutter speed changes with the scene and the photographer's goals, running from seconds to minutes. It’s best to shoot in shutter priority mode ("S" or "Tv" on camera dials) or manual mode (M), allowing you to take complete control of the settings.
Step 5: Focus Accurately in the Dark
Using manual focus for long exposure at night gets better results. Try out your camera’s Live View by zooming in on an intense light in the distance. Turn the focus ring slightly at a time until the light in your picture is well-defined and appears easy to see. If your lens has an "infinity" setting, set it; however, further adjustments may still be required.
You can also use a flashlight to highlight the object you're focusing on. Then, turn the light off when you're ready to shoot. While you work, keep your hands well away from both the lens and the camera to avoid blurring the image.
Step 6: Test Shots First
You can see how exposure, focusing, and layout work together in your pictures by testing them. If your photo is too dark or too bright, use the camera’s shutter, aperture, or ISO to fix it. Look for areas that are blurred or grainy, and then adjust the camera’s settings to manage this issue.
Thanks to sky replacement, you can easily replace a cloudy sky with a bright and dramatic one without leaving the editor.
Step 7: Capture Your Final Long Exposure Night Shot
Use a remote shutter or set the camera’s timer, so you don’t shake it as you press the button. Hold the camera still while taking your picture and ensure you don’t bump the equipment. After taking the nighttime long exposure photography, carefully examine it and make any necessary modifications to improve it.
By the way, double exposure is a creative trick often used by photographers and designers for dreamy portraits, surreal landscapes, or bold visuals in advertising. What is a double exposure? It’s the art of layering two photos into one, turning ordinary shots into something unexpected and visually powerful.
Powerful and Feature-Rich RAW Converter
Try it NowLong Exposure Photography Night Ideas

Shooting with a long exposure lets you experiment with creative techniques and visions. Let's look at these eight ideas, which could be good in the beginning.
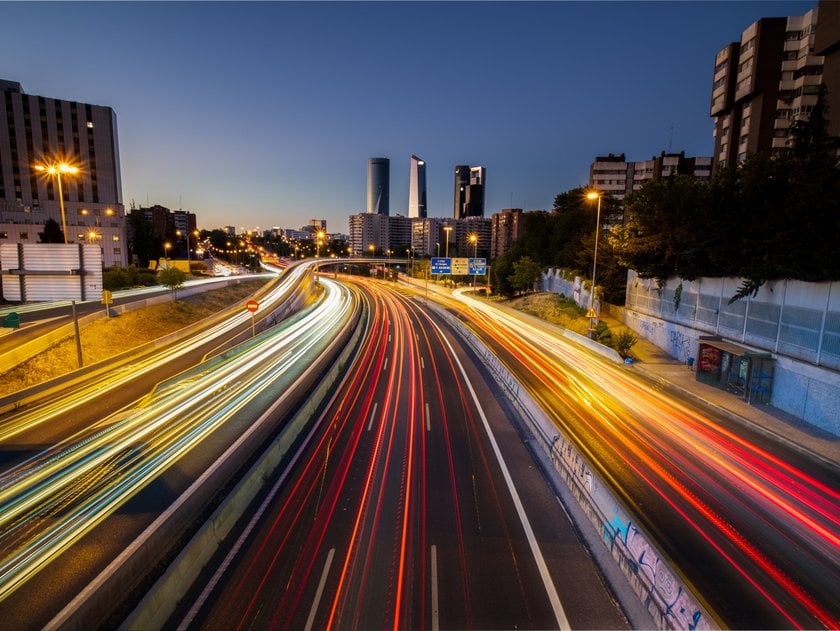
1. Light Trails: Cars, Trains, and City Lights
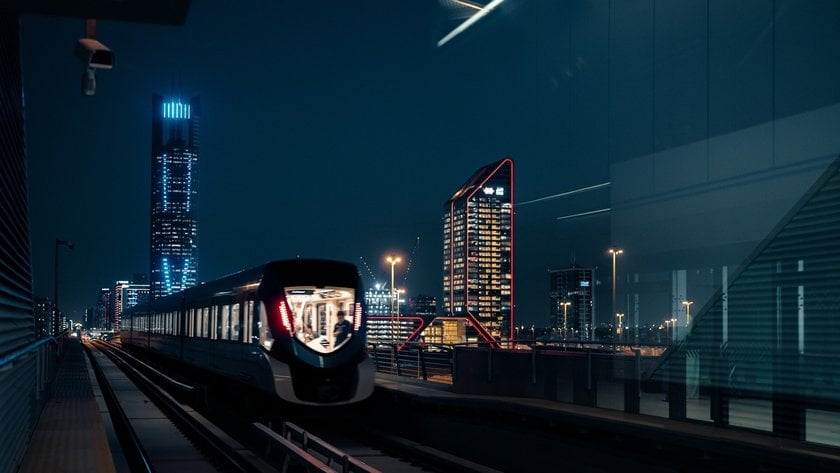
Stabilize your camera with a tripod, lower your ISO to 100–200 for reduced noise, and try an extended exposure of 10–30 seconds. Use a narrow aperture of f/8–f/16 to keep everything in focus.
For night long exposure photography, we recommend setting the focus manually on a stationary object, such as the road or nearby buildings, to avoid autofocus issues in low-light conditions. Grab your tripod — without it, your shots will be blurry. And don’t forget to turn off image stabilization if your lens or camera has it. It can introduce shake when shooting on a tripod.
If your long exposure photography at night is too bright, simply shorten the exposure time or use a smaller aperture (higher f-number). Experiment with timing settings to find the perfect balance.
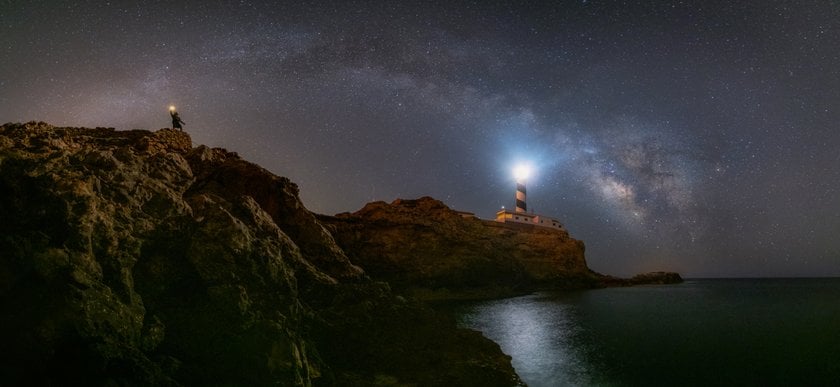
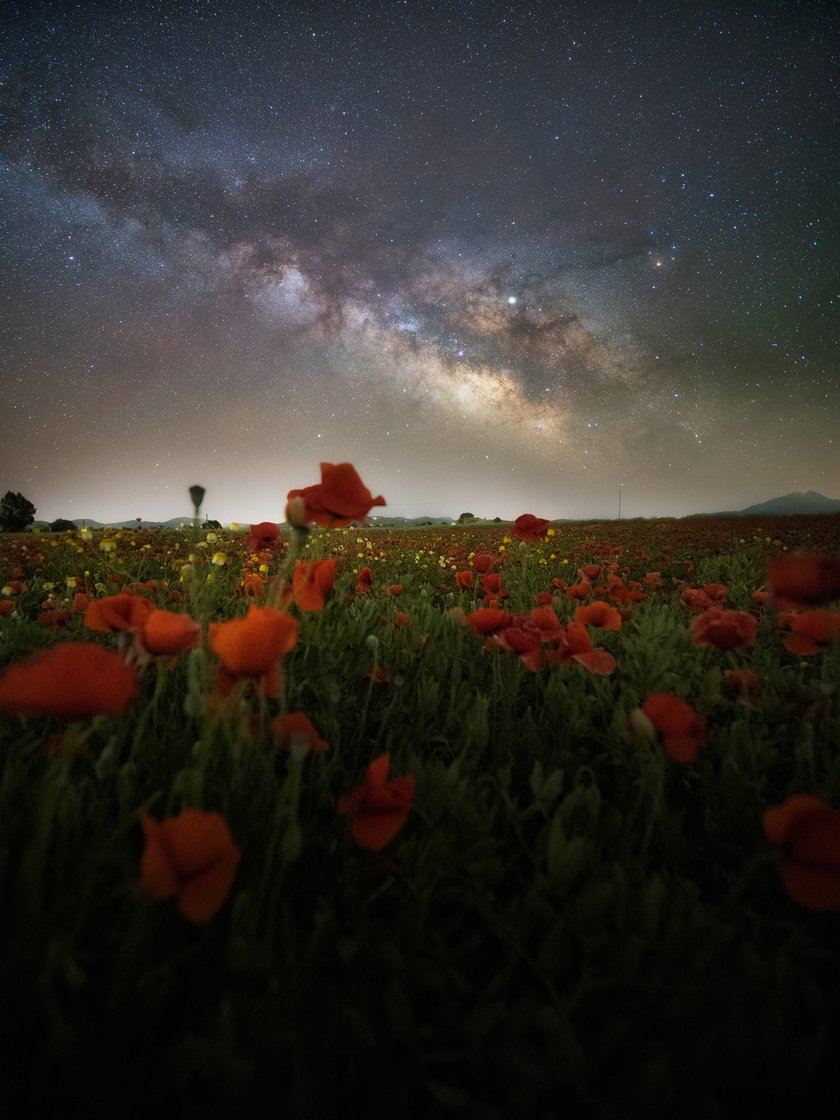
2. Star Trails and the Milky Way
 Set a higher ISO around 1600 to 3200, so your camera can "see" the faint light of the stars. Open the aperture as wide as possible, for example, f/2.8 or wider, to let in as much light as you can. Expose for between 15 and 30 seconds and use a high ISO between 1600 and 3200. It’s best to focus on infinity manually, so the stars appear as sharp as possible.
Suppose you want to show star movement as long, circular trails. To achieve this, increase the exposure time to several minutes or even hours. In that case, you’ll need a dedicated star tracker or an extremely stable tripod and plenty of patience.
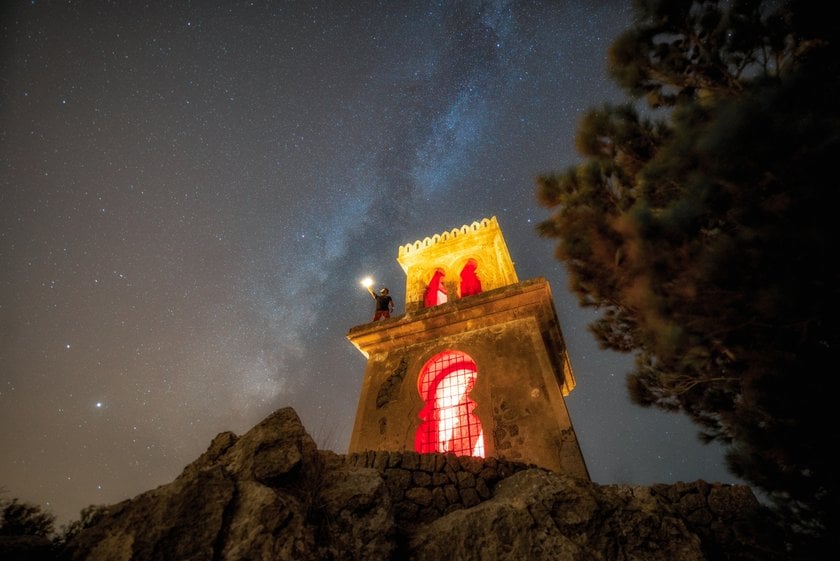
3. Light Painting Techniques
 It is where you "paint" with light in the dark using a long exposure. Use a tripod for the camera, with the shutter open, as you hold a flashlight or candle and draw unique outlines in the air with light.
For long exposure at night, set a low ISO (100–200), an aperture around f/11, and a shutter speed 10–30 seconds. It is enough time to "paint" your story with light. Focus manually to avoid confusion in the dark.
Highlight specific objects, create color splashes with light filters, or draw different forms and figures, avoiding using light that’s too bright.
4. Fireworks and Festivals
 First, choose a location with a clear view and mount your camera on a tripod. Second, set your ISO to 100–200, the aperture to f/8 to f/11, and the shutter speed to a value between 4 and 10 seconds. It's best to manually focus to infinity or roughly to the horizon to keep everything sharp.
Shooting very bright fireworks or many of them at once, use the aperture f/11 or f/16 to prevent flash and preserve sharpness. Bulb mode is helpful when you need to shoot multiple bursts, as you can manually change the exposure time by pressing and holding the shutter button for as long as desired.
5. Northern Lights and Natural Phenomena
 Find a good compromise between the length of time the camera exposes your shot and the amount of detail it captures. If the aurora is highly active and fast-moving, use a shorter exposure time of 5 to 10 seconds. For slower, more subtle auroras, increase the exposure to 15–25 seconds to let in more light. Be aware that this may soften the details and cause stars to trail slightly.
Set your ISO to 1600–3200 to pick up the faint glow, while still keeping noise under control. For optimum light, choose the widest f-stop your camera permits (try f/2.8 or larger).
6. Fireflies and Magical Night Scenes
 To photograph fireflies, use a shutter speed between 10 and 30 seconds. Set up a low f-stop (f/2.8 to f/4) to let in a lot of light, and set the ISO between 800 and 1600, depending on the level of light in the frame.
A tripod will guarantee a sharp background when the fireflies fly and make their trails. Find a place that is dark, not noisy, and has minimal artificial light.
7. Storms and Lightning Photography
 Photographing lightning requires patience and the ability to be quick with your camera. If lightning is frequent and the general lighting is low, consider using a shutter speed of 1/2 to 1/30 second. Selecting an aperture between f/5.6 and f/8 will allow you to photograph lightning clearly, adjusting it according to the brightness. And for image noise reduction, set the ISO to 100–400.
If the strikes are rare, switch to Bulb mode and keep the shutter open until you catch a flash. With a tripod, use a remote shutter release or intervalometer to take multiple pictures simultaneously, avoiding blurriness. Always put safety first. During a storm, stay away from open areas and tall buildings.
8. Meteor Showers and Night Skies
 Set your ISO between 1600 and 3200. These values are enough to capture faint meteor trails while maintaining control over noise levels. Shoot wide open, f/2.8 or lower, to catch every flicker of light.
For capturing meteors without turning the stars into blurry trails caused by Earth’s rotation, set your shutter speed between 15 and 30 seconds. Try using the 500 Rule to get rid of more star trailing. To determine how many seconds a star trail will show, divide 500 by your lens’s focal length.
Tips for Better Nighttime Long Exposure Photography
Not tired of our tips yet? We’re going to share with you how to make your shots unforgettable.
1. Managing Noise in Long Exposures
Shooting at night with long exposures can result in blurry and noisy shadows. The longer your shutter stays open, the more digital noise can creep into your image, especially at higher ISO settings.
If you’d rather not get this result, try low ISO values (100–400) and enable long exposure noise reduction if your camera supports it. The shutter speeds typically range from a few seconds to 30 seconds or even longer.
Besides, shooting in the RAW format provides greater flexibility in post-processing. Choose the best photo editor that is helpful and easy to use every day.
2. Using Manual Mode Effectively
Auto mode often struggles in low-light conditions. The camera can get confused with focus or exposure. That’s why switching to manual mode (M) gives you complete control. Focus manually, too, because autofocus regularly misses or hunts in low light.
Use the zoom on your viewfinder or Live View to nail the sharpness. And don’t forget a tripod and timer, especially for shooting starry skies, light trails, or any nighttime magic.
3. Balancing Light Sources and Ambient Light
To keep your shot looking natural and balanced, set the white balance right. For warm incandescent lights, select the "Tungsten" mode, which is approximately 3000 K. For cool moonlight, go with "Daylight" or something close to 5000–6000 K.
Also, keep an eye on exposure: shorten the shutter speed slightly with bright lights to avoid blown highlights and maintain rich shadows. Shooting in manual lets you fine-tune ISO, shutter speed, and aperture.
Later, you can customize white balance and contrast in your photo editor to bring out the colors you want. Some even offer altering specific elements with features like images masking, without changing the rest of the picture.
4. Post-Processing for Long Exposure Night Shots
Luminar Neo has all the right tools to address the special challenges of low-light imagery. AI can minimize the grain and digital noise captured with high ISO or long exposure shots. So, your photos will be sharp and clear from every angle.
This image editing software lets you work with exposure, highlights, and shadows. You can let AI Sky Enhancer make the colors of the sky better. The program’s Structure and Details Enhancer allows you to define textures in solid views like buildings and land without making moving things appear harsh or rough.
You can use Luminar Neo’s color tools to enhance hues from indoor lighting and bring out the natural shades in your nighttime shots. Thanks to layers and masking, you can tweak only some details of your picture, not the entire composition.
With these kinds of controls included, Luminar Neo makes working with night-long exposure much easier, without getting lost in confusing steps.
Long Exposure Night Photography Settings for Different Scenarios
Some night scenes require you to change your camera settings because of different lighting levels or types of objects. Here's a quick guide to help you dial in the proper exposure based on what you're shooting:
Scene | Shutter Speed | Aperture | ISO | Notes |
Cityscapes & Urban Scenes | 5–30 seconds | f/8 to f/11 | 100–400 | Go longer for smoother light trails and use low ISO to avoid noise. |
Landscapes & Nature at Night | 15 seconds – 2 minutes | f/5.6 to f/8 | 200–800 | Use longer exposures for ambient glow or reflections, and adjust the ISO as needed. |
Night Sky / Astrophotography | 15–30 seconds (stars) 1+ hour (star trails) | f/2.8 to f/4 | 1600–3200 | Use a wide aperture, a high ISO for stars, and longer exposures for trails. |
Use this recommendation as a starting point. Remember, your settings can be improved later.
Start Capturing Beautiful Long Exposure Photos at Night
We’ve just dropped a ton of tips and tricks to help you level up your long exposure night photography. It's okay to be disappointed if your first shots aren't perfect. Even experienced photographers can make mistakes. What matters is how well you manage shutter speed, exposure, and white balance. Keep shooting, learning, and let your style evolve. The result is worth the effort.


