Generative Tools in Luminar Neo: Everything You Need to Know
August 15, 2024
Unlock the potential of Luminar Neo's generative tools. Learn everything you need to know to elevate your photography with innovative features and techniques.
Generative tools are cutting-edge features that utilize advanced artificial intelligence to automatically generate or modify elements within your photos, such as expanding borders, replacing objects, or enhancing specific areas. Over the years, these technologies have evolved and become more accessible.
This article exists to help you on your way with generative technology and provide you with useful tips & tricks so that you can gain maximum value.
Advanced yet easy-to-use photo editor
Get Luminar Neo NowLuminar Neo’s Generative Tools: A Brief Overview
The generative tools offered by Luminar Neo represent a significant advancement in photo editing. They provide photographers with efficient, high-quality enhancements that elevate their creative capabilities. Before diving into the world of this technology, let’s explore some use cases where generative tools can greatly enhance your editing workflow.
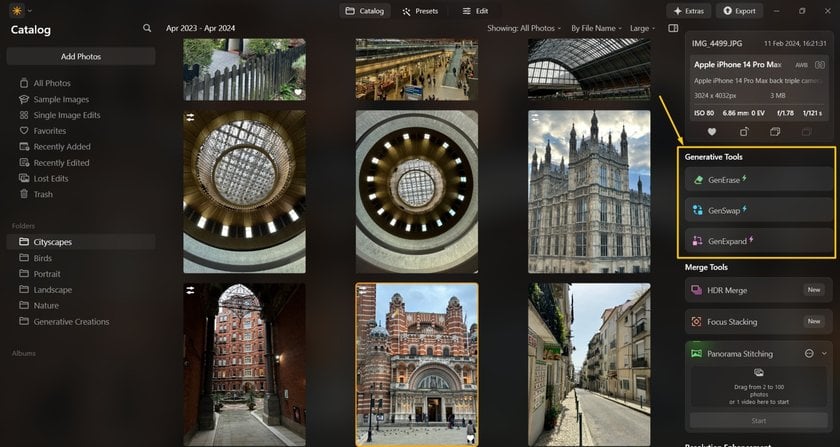
In short, Luminar Neo contains three generative tools for different situations:
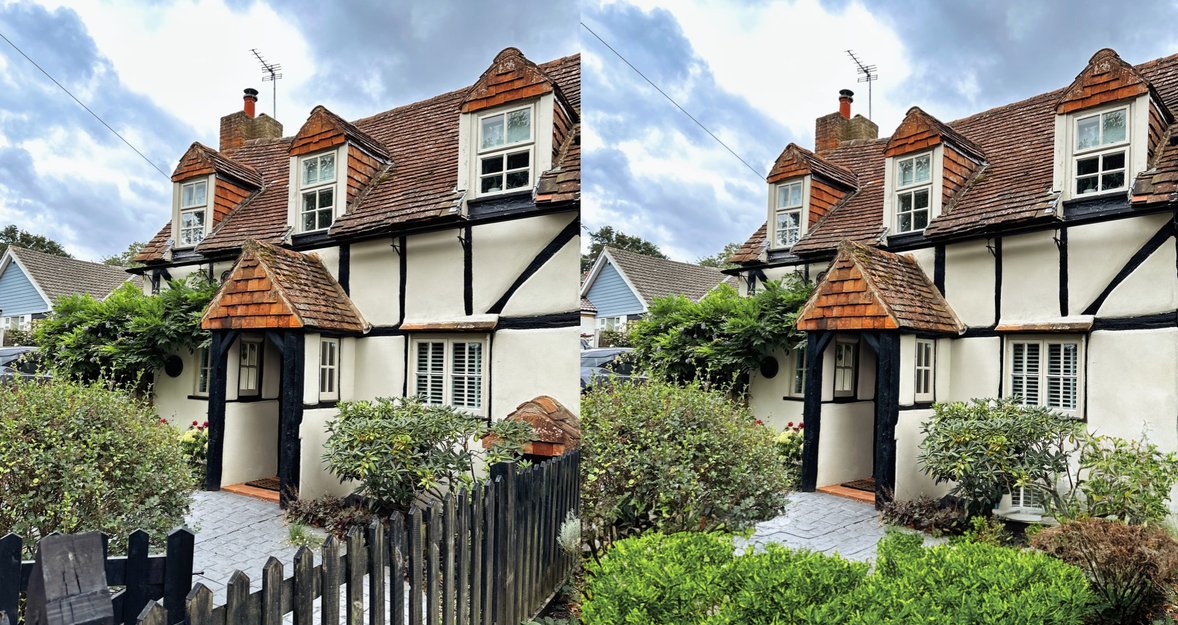
GenErase: As the name suggests, it erases unwanted objects from your photo. But it’s more than that! Did your model wear glasses, and later you noticed that the perfect shot was marred by glare on the lenses? No worries—GenErase can fix that for you.
GenSwap: This tool substitutes or exchanges objects and incorporates new details based on user input. You can not only replace an object but also add something entirely new to your photo. For instance, if you’re aiming for symmetry and harmony in a landscape shot, GenSwap can add some greenery or even a waterfall to your image!
GenExpand: An indispensable tool for composition, GenExpand extends the borders of your photo, giving you more space to work with. It’s perfect for those times when you capture an amazing bird, but in the rush, couldn’t frame the composition just right. GenExpand will give you the space you need to perfect your composition in a more relaxed setting at home.
- Keep in mind: Nothing is perfect, including intelligent generation. Sometimes, you may need a few attempts to achieve the desired results. It’s okay to try again until you are satisfied!
Now, let's take a closer look at each tool and discover how to use them to keep your photos looking their best.
GenErase
GenErase is one of the three generative tools available in Luminar Neo. Its primary function is to remove objects from your image using content-aware AI techniques to intelligently erase elements.
How to Use GenErase: A step-by-Step Instructions
1. Select Your Image
In the Catalog view, click on the image you want to edit, then select “GenErase” which is located on the right-side panel.
2. Outline the Object
The GenErase window will open. Use the Select Brush to outline the object you want to remove. If you need to adjust the edges or correct any accidental selections, use the Deselect Brush. You can change the brush size using the slider.
3. Erase the Object
Once your selection is ready, click the “Erase” button and wait for the result.
4. Save Your Work
If you’re satisfied with the result, press the “Save” button at the top right. The edited image will be saved to the “Generative Creations” folder in the Luminar Catalog. Don’t forget to export it!
If the result isn’t quite what you wanted, don’t worry! You can continue refining by clicking the “Erase” button again. You can also reset the selection by clicking “Reset Selection” and readjusting the area with the brush.


Tips for Masking Objects in GenErase
To utilize GenErase in the most effective way, here are some important advice:
Tip#1: Remove Objects One at a Time
For the best results, remove objects one by one, ensuring they are fully masked. For example, if you need to erase both an unwanted person and a car in the background, start by fully masking and removing the car. Once the car is successfully removed, proceed to erase the person in the same manner.
Tip#2: Ensure Full Mask Coverage
When selecting an object, make sure it is fully masked. Cover not just the boundaries but extend the mask slightly beyond the object to ensure complete coverage.
Tip#3: Adjust the Mask for Better Results
If the initial result isn’t perfect after a few attempts, try adjusting the mask instead of simply regenerating the image by clicking “Erase.” You can either expand the mask a bit more around the object or reduce it slightly to refine the result.
Wipe Away Photo Distractions with GenErase
Try the Magic Now!GenSwap
GenSwap can help you to exchange any object in your image for another one or generate something completely new.
How to Use GenSwap: A step-by-Step Instructions
1. Select Your Image
In the Catalog tab, select the image you want to edit and click on “GenSwap” in the right-side panel.
2. Make Your Selection
The GenSwap window will open. Use the brush to select the area you want to swap.
3. Enter Your Prompt
After making your selection, a prompt text box labeled "What do you envision here?" will appear. Enter your desired prompt in the text field. For additional tips on prompts and masking, continue reading the article.
4. Generate the Swap
Click the “Swap” button to start generating the new image. Wait for the process to complete.
5. Review and Save
If you’re satisfied with the result, save it. If not, try another iteration by clicking “Swap” again. You can view all generated versions and choose the best one using the Undo/Redo arrows.
6. Final Save
Confirm your results by clicking the “Save” button. Your edited photo will be saved in the “Generative Creations” folder.
Tips for Better Results in GenSwap
To effectively replace objects using GenSwap, keep in mind such tips:
Tip#1: Mask Appropriately for Scale
Ensure that your masked area is large enough to fit an object you’re trying to generate. For example, if you wrote “waterfall” in your prompt, mask enough space for it. Also, consider the scale—if the waterfall is meant to be far away, use a smaller mask, but if it’s in the foreground, use a larger mask.
Tip#2: Mask the General Area, Not the Specific Contour
You don’t need to outline a specific contour of the object. It is enough to mask a rough area simply. For example, if you want to generate a palm tree, do not paint each leave with the mask—just mask it as a roughly roundish-oval shape.
Tip#3: Use Clear and Simple Prompts
In the prompt field, stick to nouns or adjectives plus nouns, like "blue sea" or "big tiger." Avoid using verbs like "change," "erase," "remove," "add," or "create," as they can confuse the system. While GenSwap may work with prompts in other languages, using English will yield the most accurate results.
Tip#4: Experiment for the Best Results
If you are not happy with the first try, play around with the same mask, try different prompts, or adjust your approach. You will find the right recipe for a perfect generation.
Tip#5: Avoid Verbs in Prompts
Remember not to use verbs, as it confuses the system. For instance, instead of “change apple to banana,” simply write “banana.” Another example would be: instead of “replace grass with flowers,” write “flowers” or “flowering ground.”
Try GenSwap for Quick Photo Element Replacement
Take a look!GenExpand
GenExpand is a generative tool for expanding the borders of your photo. It adds a new dimension to your original compositions.
How to Use GenExpand: A step-by-Step Instructions
1. Select Your Image
In the Catalog view, click on your image, then select “GenExpand,” which is located on the right-side panel.
2. Adjust the Cropping Frame
The GenExpand window will open, displaying your photo with a white cropping frame around the borders. Pull the edges of the frame outward to expand the scene. To maintain quality, the canvas can be extended by up to 25% beyond the original image dimensions. If you need to expand further, you can repeat the process, expanding by 25% increments.
3. Enter a Prompt (Optional)
Use the prompt in the text box “What do you envision here?” to realize your vision or address undesired outcomes.
4. Generate the Expanded Image
Click “Expand” to generate the expanded image. If you wish to enlarge your photo further, adjust the edges again and click “Expand” once more.
5. Save Your Work
When you’re satisfied with the results, click the “Save” button. Your expanded photo will be saved in the “Generative Creations” folder.
Tips for Effective Expanding
If you want to take out the most of GenExpand, follow these simple tips:
Tip#1: Expand One Side at a Time
It’s more effective to focus on expanding one side at a time rather than trying to expand two or more sides simultaneously.
Tip#2: Take Smaller Steps
Instead of expanding by 25% all at once, try generating about 10% of the image at a time. This helps the AI handle the expansion more accurately without having to imagine too much at once.
Tip#3: Use Prompts When Necessary
Writing a prompt for GenExpand isn’t required. If you don’t add a prompt, GenExpand will intelligently analyze the image and anticipate how the additional space should be populated. However, prompts can be helpful, especially when expanding by more than 25%, to guide the AI in understanding what should appear in the expanded space.
Enter the Future of Photo Editing with GenExpand
Give it a try!Bottom Line
Now, you’re equipped to make the most of Luminar Neo’s generative tools! These AI-driven features, from intelligent adjustments to creative effects, not only save time but also empower you to achieve professional results with ease. Seamlessly integrating into your workflow and fostering artistic exploration, these tools are invaluable for anyone looking to enhance and transform their photos effortlessly and with precision.
We hope the insights you’ve gained today are valuable, and we look forward to bringing you more great content from Team Skylum!