Flat Lay Photography: A Full Guide To Top-Down Angles
June 20, 2025
What is a flat lay? How to take a perfect flat lay shot? Explore expert tips on lighting, angles, and layout to improve your product, food, or lifestyle photography.
You know that feeling when everything just clicks in a frame? Flat lay photography gives you that chance. It’s simple on the surface: objects are arranged in a background, and the camera is pointed straight down, creating a classic bird's eye view, but there’s real art in making it sing.
If you’re curious about how to bring more depth, texture, and intentionality into your work, this guide is for you. We’ll talk equipment, gear, composition, light, and ecommerce photo editing techniques—including adding elements in post-processing—that take a flat lay from decent to magnetic. Let’s explore it together, and maybe spark some new ideas for your next shoot.
What is Flat Lay Photography?

Flat lay photography is one of those things that seems simple until you try it. It’s just shooting from above, right? Technically, yes — you’re taking a photo of objects laid out on a surface, from directly overhead. But the real magic comes from how you arrange everything.
A good flat lay feels like a tiny world. Every object, every shadow, every little gap has a purpose. It’s less about capturing a moment and more about a scene that’s intentionally created from scratch. You’re styling with intention — shaping mood, color, story — all within a single frame.
Your AI-Powered Photo Editor for MacOS and Windows
Discover Now!You’ll see flat lays everywhere: on Instagram, in cookbooks, product ads, lifestyle blogs, and especially in flat lay product photography. They’re clean, eye-catching, and super effective at telling a visual story. Say you’re photographing a sandwich. You could just shoot the finished thing — or you could lay out the bread, the tomatoes, the fresh herbs, maybe a crumb or two — and suddenly it feels more real, more human. Like someone just stepped away from making lunch.
That’s why brands love flat lays. But honestly, that’s why we love them too. Because when you get it right, creating flat lays doesn’t just look nice — it feels like something. Like you’re letting someone in on a moment, or a process, or a little piece of your world.
How to Take Flat Lay Photos: A Brief Guide
 A great flat lay doesn’t just happen. It’s built piece by piece, with intention, patience, and a good eye. While the final image might feel effortless, there’s often a lot of quiet problem-solving behind the scenes. Achieving perfect alignment in your composition is essential for a polished, professional look. For working solo in your living room, collaborating with a stylist on set, or as a small business owner looking to elevate your brand, the right product photography setup makes all the difference.
Here’s what matters most — and how to make it work for your process.
Gear That Actually Helps (And Why)
You don’t need a full-blown studio to shoot beautiful flat lays. What you do need is clarity, stability, and a few tools that support your creative flow. Choosing the right equipment—such as cameras, tripods, and lighting—can make a significant difference in achieving professional-quality flat lay photography.
Lenses
Your choice of lens will shape the entire feel of the shot. For crisp detail and minimal distortion, many photographers love primes like a 35mm or 50mm. If you want more flexibility in framing, a 24–70mm zoom gives you options. Shooting something tiny, like jewelry or textures? A macro lens will help bring out the fine details. The position of props in relation to the camera lens can also impact your composition and help avoid distortion, so adjust your setup accordingly.
If you’re not sure where to start, we’ve put together a breakdown of the best lenses for product photography; feel free to check it out and see what fits your style best.
Camera
There’s no single “best” camera for flat lays, but there are features that make things easier. Swivel screens or tilting LCDs help when your camera’s pointing straight down and you can't look through the viewfinder. Still, even that has its limits…
External Monitor
If you can, hook one up. A monitor gives you a clear, true-to-scale view of your composition. It’s especially helpful when working with stylists or clients, but even solo, it’ll save you from catching issues too late. Uneven spacing, weird reflections, small distractions — they all show up clearer here than on the back of your camera.
Tripod or Overhead Rig
Flat lays need a perfectly steady, top-down angle. To achieve optimal results, make sure your camera is positioned at a right angle (90 degrees) to the surface. A tripod with a horizontal arm can do the job if you’re just starting out. But if you shoot flat lays often or want more flexibility, an overhead rig will give you better control and fewer limitations when framing or adjusting.
Lighting
Good light is everything. You can use natural light, a couple of reflectors, or go all in with softboxes and continuous lights. For natural light, set up your scene near a window to take advantage of soft, diffused light. Choosing the right windows, such as north-facing windows, can provide consistent, optimal lighting conditions. What matters most is that your lighting feels soft and intentional — no harsh shadows unless you’re creating a moody look on purpose. We’ll dive into lighting later, but keep this in mind from the start.
Exclusive Tools of Endless Possibilities in One AI Editor
Explore Now!Backdrops
This is where your personality comes through. From linen and tile to wood, concrete, or colored paper, there are countless backgrounds available for flat lay photography, each offering a unique visual foundation. When creating flat lay images, carefully select and arrange backgrounds and surfaces to match the desired mood or style. Lay out a few test props and see how each one interacts with the surface.
For food photography, a cutting board can serve as a textured and versatile background or prop, adding depth and contrast. Poster board is also a simple, effective DIY background or bounce board for lighting and staging. The goal is to complement your subject, not compete with it. Soft textures and neutral tones often let your styling shine.
Flat Lay Photography Setup

Start With the Background
Before you place a single prop, decide on the mood. What feeling are you trying to evoke? Warm and cozy? Clean and editorial? Let that guide your backdrop and the items you include. Try a few surface options, make a white background or colourful one, experiment with textures, and don’t rush this part; it sets the tone for everything else. For example, a rustic wooden table can create a warm, inviting feel, while a marble slab or crisp white paper gives a clean, modern look. These examples of backgrounds help set the mood for your flat lay.
Camera Position: Keep It Truly Level
When we say top-down, we mean really top-down. Even a slight tilt can throw off the lines in your frame, and if you’re shooting anything with structure, like packaging or books, that distortion will show. Use a tripod with a built-in level or turn on your camera’s grid or level guide to double-check your angle before you start styling.
Sure, you can always flip an image in post to improve the visual flow, and sometimes that creative choice works beautifully. But flipping an image won’t fix a crooked setup. Get your camera level from the start, and you’ll save yourself from hours of frustrating edits later.
Camera Settings for Flat Lay Photography

Here’s a quick breakdown to help you dial in the technical side, depending on your lighting setup and creative intent:
Aperture: f/5.6 – f/11 | Keeps most elements sharp. Go higher (f/13+) for deeper scenes. |
Shutter Speed: 1/125 or slower (with tripod) | Stability matters more than speed here. Use a remote or timer. |
ISO: 100–400 (as low as possible) | Lower ISO = less noise = cleaner final image. |
White Balance: Manual or custom based on light source | Avoid Auto WB to keep colors consistent, especially with props. |
Focus Mode: Manual focus or live view zoom | Focus carefully on key details. Combine with focus stacking if needed. |
File Format: RAW | Gives you full control in post, especially for correcting exposure. |
Composition Tips for Flat Lay Photography
Let’s be real: flat lay photography isn’t just about putting pretty things on a surface and snapping from above. The magic is in how you arrange them. Establishing a clear focal point is essential to guide the viewer's eye and create visual impact. Composition in flat lays is like choreography: every item has a role, every bit of space tells part of the story. Identifying the really important part of your composition is key to a successful flat lay. Seek inspiration from other flat lays or props to fuel your creativity..
Start with Intent, Not Rules
hThe rule of thirds is a great place to begin, especially when you’re working with logos, labels, or a standout color you want to draw the eye to. Imagine your frame divided into a grid and use those intersections to anchor key elements. It helps give structure without making the shot feel too rigid. But don’t treat it like a checklist—use it as a starting point, then break it if your eye tells you to, especially if the composition felt more natural or impactful that way.
Symmetry vs Creative Tension
Symmetry can be soothing: two coffee cups placed just right, textures mirroring across the frame. But balance doesn’t have to mean perfect mirroring. Sometimes it’s just about visual weight: a large object balanced by several smaller ones, or a soft fabric flowing in one corner to counter something bold and geometric in another. You can also use the left corner to control light or balance the composition, ensuring shadows and highlights are distributed as you intend.
Then there’s the other side of the coin—controlled chaos. That slightly off-kilter setup that feels spontaneous, alive. You might cluster elements toward one side and leave the other more open. Done intentionally, it creates rhythm and energy. The kind of shot that feels effortless, even if you nudged that spoon thirty times to get it right.
Give It Room to Breathe
Negative space is your secret weapon. A little emptiness between objects lets the composition breathe. It draws the eye to what matters, makes the scene feel calm and confident. If a flat lay ever starts feeling cramped, try pulling things apart. More often than not, less is more.
Think in Layers, Not Just Lines
Flat lays may be two-dimensional by nature, but depth still matters. Layering adds richness. Think of a plate on a linen napkin on a wooden surface. Or a journal sitting on top of an open magazine, with a pen laid diagonally across. These little stacks and overlaps create a visual hierarchy and make the viewer feel like they could reach in and touch the scene.
Handle Shadows and Reflections Before They Handle You
Shadows can work for you or against you. If objects vary in height or you’re stacking layers, you might get unexpected shadows creeping into your shot. A softbox helps, or even a bounce card to fill them in gently. Always check the top left corner of your scene to block any unwanted light leaks or shadow leaks, which helps achieve a cleaner, more professional look.
Reflections, especially on glass or glossy packaging, are another thing to watch for. A tiny tilt — just a couple degrees — can completely change the glare. You can fix it in post, sure, but if you catch it in-camera, you save time and keep the light looking more natural.
Lighting For Flat Lay Photography
Lighting Type | Details |
Overhead Lighting Great for a clean, even look with minimal shadows. | Use a softbox directly above the scene for soft, balanced illumination. |
Side Lighting Adds depth, texture, and subtle contrast. | Angle the light at around 45° to create soft shadows. Avoid blocking key elements. |
Fillers & Reflectors Help control shadows and brighten dark areas. | Use white cards, bounce boards, or reflectors to bounce light back into the scene. |
Mood Lighting Shapes the overall atmosphere of your shot. | Match the light to your subject’s feel — clean and bright for products, moody for rustic scenes. |
Flat Lay Photography Ideas

So how do you make a flat lay stand out? The top-down angle gives you structure; now it’s all about styling with purpose. The strongest flat lays do more than show objects. They hint at a story, a moment, a feeling. Here are a few ideas to help you bring that out:
Food
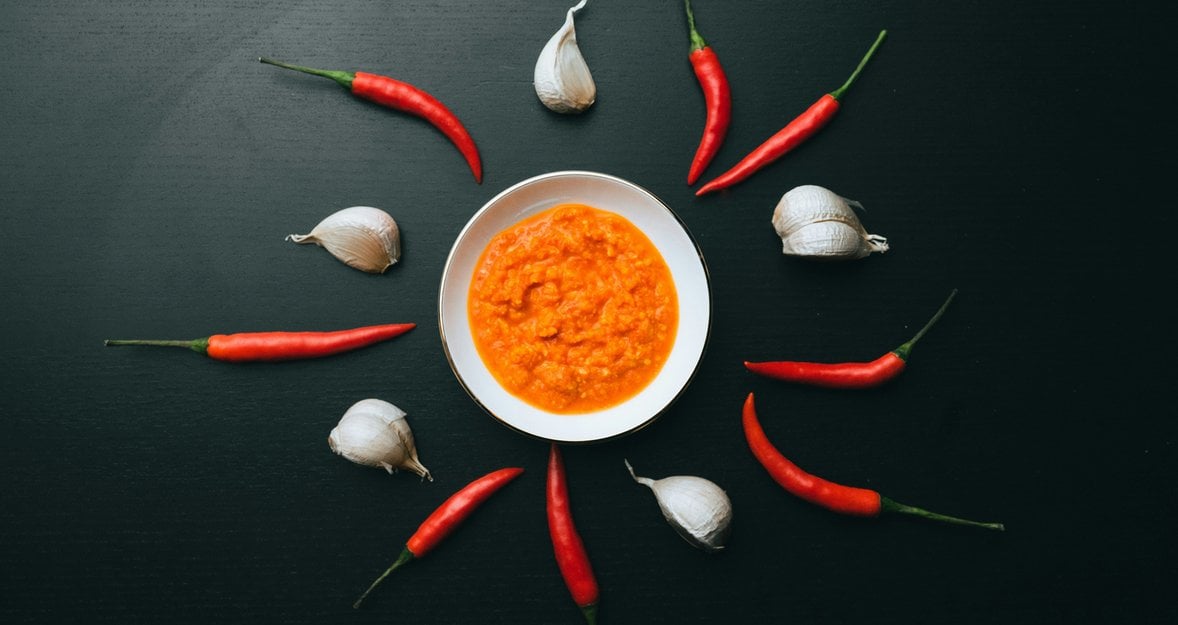
Food is one of the most expressive flat lay subjects. You can add character with decorative plates, vintage cutlery, or textured linens. Scatter a few raw ingredients — herbs, spices, crumbs — to create a scene that feels real and alive. Color is a big ally here. Vibrant elements naturally guide the eye and help build a visual rhythm across the frame.
Products
To make product shots more compelling, think about the world around the item. An eyeliner gains depth when paired with related pieces like a curler, brush, or mirror. For a tech gadget, bring in lifestyle elements — maybe a coffee cup, notebook, or plant. The goal is to show how the product fits into someone's daily life, without cluttering the frame.
Fashion
Flat lays in fashion often benefit from small, suggestive props that reflect a lifestyle. Styling a tennis shirt? Include a sweatband, half a racket peeking into the frame, or even a rolled-up towel. Think atmosphere over literal styling. A well-placed detail can say a lot more than a fully staged scene.
Styling Tip: Your hero subject should always have breathing room. Props are supporting characters — they shouldn’t steal the scene. If something feels too loud or oversized, crop it partially or use it along the edge of the frame to create balance and flow.
Advanced Techniques for Flat Lay Photography
Once you’ve mastered the basics, it’s time to push your flat lay photography further with some advanced techniques that can truly set your images apart. Great flat lay photography is all about creating visually appealing stories that draw the viewer’s eye and keep them engaged.
Start by rethinking your composition. While the classic bird’s eye view is a staple of lay photography, you can add depth and interest by layering objects or introducing unexpected elements. Try scattering flower petals across your flat lay background, or use textured props to add dimension and contrast. These small touches can transform a simple shot into a scene that feels rich and intentional.
Your choice of camera makes a difference, too. A DSLR camera gives you full control over camera settings, allowing you to fine-tune aperture and shutter speed for the perfect shot. If you’re using a phone camera, take advantage of manual modes or camera apps that let you adjust these settings. To avoid camera shake and ensure your flat lay photos are tack-sharp, always use a tripod or a stable surface—especially when shooting at slower shutter speeds.
Experiment with your camera settings to achieve different effects. A wide aperture (like f/2.8) can create a soft, blurred background that makes your main subject pop, while a narrower aperture (like f/8 or f/11) keeps every detail in focus for those crisp product shots. Adjust your shutter speed to match your lighting conditions, and don’t be afraid to play with exposure to get the mood just right.
Finally, pay close attention to your flat lay background and supporting elements. Natural materials, colored paper, or even a simple white background can serve as the perfect canvas for your scene. The key is to create balance—let your main subject shine, but use props and textures to add visual interest without overwhelming the frame.
Post-Processing Tip: Focus Stacking
One of the trickiest things about flat lays is getting everything in focus, especially when you’ve got layers, props, and textures at slightly different heights. You line up your shot, it looks great… and then you zoom in and realize the front edge is sharp, but the back’s a little soft. Classic.
That’s where focus stacking can save the day.
Instead of relying on one frame to do it all, you shoot a few — each one focused on a different part of the scene. Then you blend them together in post so the final image is sharp from edge to edge. It sounds technical, but once you try it, it’s pretty intuitive. Tools like Luminar Neo handle the merging for you, pulling the sharpest parts from each frame and giving you that clean, polished result.
It’s one of those behind-the-scenes tricks that makes a flat lay really sing — and once you start using it, it’ll become second nature.
The Bottom Line
Flat lay photography might seem simple at first, just objects on a surface, shot from above. But the more you work with it, the more you realize how much depth and storytelling you can build into that one frame. It’s used everywhere for a reason: food, fashion, tech, lifestyle—all of it benefits from this clean, intentional perspective.
For us as photographers, flat lays are more than a trend. They’re a chance to compose with purpose, to play with light and texture, to bring a whole scene to life from a bird’s-eye view. And when you combine good styling with smart lighting and sharp post-processing (like focus stacking), the results can feel both effortless and artful.
If you haven’t explored flat lays deeply yet, now’s a good time to jump in. Treat it like a visual puzzle. Experiment. Push things around until it feels right. It’s a skill worth adding to your creative toolkit, and your clients will notice the difference.