November 05
18 min. to read
How to Photograph Jewelry: 4 Tips for Clear, Detailed Photos
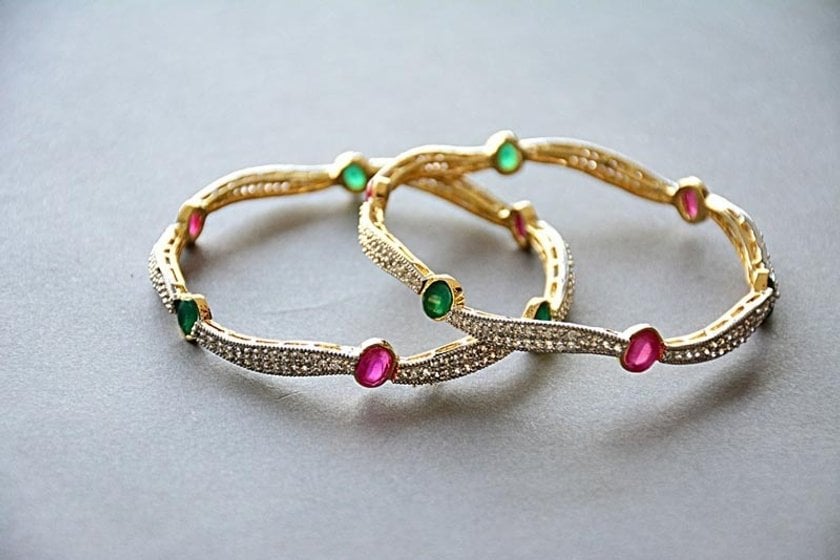
Jewelry photography needs to show several things at once: the shape of the piece, the finish of the metal, the color of the stones, and details small enough to miss at first glance. Reflective surfaces and shallow depth of field make that more challenging than simply placing a ring against a white background.
Start with clean jewelry, a stable camera, and a diffused light source. Choose a background that separates the piece from its surroundings, then adjust the light and camera position until its shape becomes clear. Editing can refine the result, but careful preparation saves considerable retouching time.
These four tips cover the process from setting up your first shot to preparing a consistent collection for an online store.
Don’t feel like reading the whole breakdown? We’ve pulled together a quick summary below.
Key Takeaways
Clean and position each piece before shooting; dust and fingerprints become obvious in close-ups.
Choose backgrounds according to contrast, material, and intended use rather than assigning a fixed color to gold or silver.
Use broad, diffused light to describe metal surfaces and a smaller directional source when gemstones need more sparkle.
Stabilize the camera, including for overhead photographs, and check depth of field carefully.
Use focus stacking when one frame cannot keep the necessary details sharp.
Edit for accurate color and clear presentation while preserving the jewelry’s actual design and condition.
1. Choose a Background That Makes the Jewelry Easy to Read
The background should help customers understand the piece. Its color, texture, and brightness all affect how clearly the jewelry stands out.
There is no rule that gold and silver must use different backgrounds. Both can work on white, gray, black, or a carefully chosen color. What matters is whether the outline remains visible and the surroundings introduce unwanted reflections.
For a coordinated catalog, choose a repeatable setup that works across the collection. Add more expressive backgrounds for campaign images or social posts where context contributes to the story.
Compare Common Background Options
Background | Useful for | What to watch |
White or off-white | Clean product views and consistent catalogs | Pale metal or clear stones may lose definition |
Light gray | A neutral setting with more visible edges | Uneven lighting can create distracting patches |
Black or dark gray | Separating bright metal and emphasizing highlights | Dust and unwanted reflections become noticeable |
Matte colored paper | Brand imagery and seasonal collections | Reflected color can affect the appearance of metal |
Fabric, stone, or wood | Lifestyle photographs and material contrast | Strong texture may compete with small details |
Glossy acrylic | Intentional reflections beneath the piece | Scratches, dust, and doubled outlines need careful control |
Test a background with the actual jewelry before committing to an entire shoot. A surface that complements a gold pendant may reflect an unwanted tint into a polished silver bracelet.
For more setup options, explore this guide to product photography backgrounds.
Position Each Piece Deliberately
Arrange necklaces so the chain leads naturally toward the pendant. Align earrings consistently, and angle rings so the setting and band remain distinguishable.
Small supports can help hold a piece upright, but use materials suitable for the item and keep them away from delicate finishes. Check the camera view before adjusting further: a support hidden from your eye may still appear in the photograph.
Capture more than one useful view. A front image shows the design, while a side or rear view can explain the setting, clasp, thickness, or construction. A photograph worn by a model can add scale that an isolated product shot cannot communicate.
2. Control Light, Reflections, and Sparkle
Polished jewelry reflects the environment around it. The light source, camera, nearby walls, and even your clothing can appear in the surface.
Instead of trying to eliminate every reflection, shape them so they describe the jewelry. A smooth highlight can reveal the curve of a band; an irregular dark patch may obscure it.
Start With One Diffused Light Source
Place the jewelry beside a window with a sheer curtain, or use a studio light through diffusion material. Position a white card on the opposite side to bounce some light into the shadows.
Take a test photograph, then change one element at a time. Move the light, rotate the piece slightly, or adjust the reflector. This makes it easier to understand what improved the result.
Window light is accessible, but its intensity and color can change during a long session. Controlled studio lighting can make a large catalog easier to reproduce consistently.
Avoid mixing window light with unrelated room lights unless you deliberately want that effect. Different light colors can create casts that are difficult to correct across a small reflective object.
Give Metal a Visible Shape
Completely surrounding jewelry with white diffusion can produce smooth lighting, but it may also make polished metal look flat. Small dark cards outside the frame can introduce controlled reflections that define an edge or curve.
Move these cards gradually while watching the image. The goal is a readable outline and a convincing finish.
A light tent can simplify the environment around the piece, especially for a basic catalog setup. However, it still needs thoughtful light placement; it does not automatically produce the best result for every surface.
Add Sparkle Without Losing Detail
Broad light is useful for showing metal, while faceted stones may benefit from a smaller directional source that creates distinct highlights. A combination can work better than either alone.
Begin with the diffused setup, then introduce a small light and adjust its angle. Slightly rotating the jewelry may change which facets catch it.
Keep the effect controlled. A few bright reflections can communicate sparkle, but large white patches can conceal the stone’s shape and color. Avoid adding artificial starbursts to product images when they misrepresent how the piece looks.
3. Capture Fine Details With a Stable Camera
At close distances, small movements become significant. Camera shake, a swaying chain, or a slight focus error can soften details that customers need to examine.
Clean the jewelry immediately before photographing it, using an appropriate method for its materials. Handle it carefully afterward to avoid adding fingerprints.
Use Support for Every Angle
A tripod helps maintain framing and allows slower shutter speeds when the subject is stationary. For overhead photographs, a secure overhead arm or copy stand serves the same purpose.
Use a timer or remote release to reduce movement when taking the picture. Give suspended pieces time to stop moving before shooting.
Handholding can work for lifestyle images, but holding your breath is not a substitute for stable support during precise product photography.
Choose a Lens for the Required Detail
A macro lens is useful when photographing small stones, engravings, and settings. A lens capable of 1:1 reproduction can record very small subjects at substantial size on the sensor, although not every photograph needs that magnification.
Working distance matters as much as focal length. If the camera is too close, it may block the light or create a large reflection in the jewelry.
A standard lens may be sufficient for a complete necklace or a model wearing earrings. Choose equipment according to the framing you need rather than assuming every image requires an extreme close-up.
Use Camera Settings as Starting Points
Setting | Practical starting point | Why it matters |
File format | RAW, when available | Provides flexibility for white balance and tonal adjustments |
ISO | A low native setting, often ISO 100 or 200 | Helps preserve clean detail when enough light is available |
Aperture | Around f/8 on many interchangeable-lens setups | Offers a starting balance between depth of field and sharpness |
Shutter speed | Adjust for the lighting and subject movement | A stationary setup on a tripod can use a longer exposure |
White balance | Fixed setting or a neutral reference | Helps keep color consistent across the series |
Focus | Precise focus checked at magnified view | Confirms that the important detail is sharp |
These are starting points, not universal settings. Sensor size, magnification, lens characteristics, and the angle of the piece all change the result.
Stopping down increases depth of field, but very small apertures can reduce fine detail through diffraction. Check the photograph rather than assuming the highest f-number produces the sharpest image.
Use Focus Stacking When Necessary
A ring photographed at an angle may have a sharp front stone but a soft rear setting. If the entire piece needs to be clear, focus stacking can help.
Keep the camera, jewelry, exposure, and lighting stable. Capture a sequence that moves focus gradually from the nearest required detail to the farthest, with overlapping sharp areas. The images are then combined into a photograph with greater apparent depth of field.
Luminar’s focus stacking tool can combine photographs taken at different focus positions. Inspect the merged result around prongs, fine chains, transparent stones, and overlapping edges, where blending errors may appear.
Stacking is most useful for stationary product views. A model wearing jewelry will usually move too much for a simple stack, so choose the focus point and depth of field for a single exposure.
4. Edit Jewelry Photos Without Changing the Product
Jewelry editing should make the piece easier to inspect. Accurate color, readable detail, and a clean presentation matter more than an aggressive visual effect.
In Luminar, start with the overall image before making small local corrections. Keep the original file so you can compare the edit with what the camera captured.
Correct White Balance and Exposure
Use a neutral reference photographed under the same lighting to establish a starting white balance. Do not use the gold itself as a neutral target: its warmth belongs to the material.
Adjust exposure while watching bright reflections. Lift dark areas only enough to reveal necessary detail; some contrast helps communicate depth and polish.
Enhance AI can provide an initial overall adjustment. Its Accent AI control combines several corrections affecting areas such as tone, contrast, color, and detail. For jewelry, apply it conservatively and compare the result with the original before continuing.
Refine Metal and Gemstone Colors
Use photo color editing tools to address unwanted casts and keep the collection consistent.
A green reflection from a nearby surface is different from the natural green of a gemstone. Apply local corrections where necessary so fixing one does not change the other.
Avoid increasing saturation until a stone appears more vivid than it is. When preparing sales images, the customer should recognize the same piece when it arrives.
Retouch Dust and Temporary Distractions
Inspect the photograph at full size for lint, sensor spots, fingerprints, or visible supports. Remove distractions carefully, checking that repairs preserve the shape of fine chains, engraving, and settings.
Do not erase permanent scratches, alter stone size, or change the construction of an item being sold. Secondhand jewelry photographs should show its condition accurately.
Generative replacement is especially unsuitable for rebuilding product details that must remain exact. A plausible-looking clasp or gemstone is not necessarily the one on the actual piece.
Check Backgrounds and Sharpness
If the background needs to be brighter, adjust it separately where possible. Brightening the entire frame until the background turns white can erase pale edges and highlights.
Apply sharpening at a level that suits the output. Too much can create halos around metal edges or make small details look brittle. Noise reduction should also preserve the texture that remains in focus.
For an online collection, keep framing, scale, and background brightness reasonably consistent. A ring should not appear dramatically larger in one listing simply because the crop is tighter.
An ecommerce photo editor can support this finishing stage, but review each exported image before uploading it.
Processing Larger Jewelry Catalogs With Luminar Engine
For studios and retailers handling substantial image volumes, routine preparation may become part of a broader production workflow.
Luminar Engine is a B2B image-processing SDK that runs on a company’s own infrastructure. Its base operations include RAW conversion, lens and perspective correction, and exposure adjustment. A technical team integrates it into the business’s existing system, with images processed within its network.
A jewelry business could use it to prepare incoming photographs before detailed retouching and quality review. The surrounding software would continue to handle product identifiers, file organization, approvals, and publishing.
The value is repeatable processing at volume. Reviewers still need to assess gemstone color, fine edges, reflections, and whether each image accurately represents the product.
Check the Complete Collection Before Publishing
Compare the images together rather than reviewing only individual files. Check that metal colors remain consistent, backgrounds match, and the selected angles explain the piece clearly.
Include a strong overall view, useful construction details, and a sense of scale where appropriate. If something important remains unclear, another photograph may solve the problem more effectively than more editing.
FAQ
What Is the Best Background for Jewelry Photography?
A neutral white or gray background is a practical starting point for catalog images. Dark or colored backgrounds can also work when they provide clear separation and suit the brand. Test them with the actual jewelry, since reflective surfaces can pick up surrounding colors.
How Do You Make Jewelry Sparkle in Photos?
Use a small directional light to create highlights on the facets, supported by broader diffused light that keeps the rest of the piece visible. Adjust the light angle and the jewelry’s position while checking that bright reflections do not obscure important details.
Can You Photograph Jewelry With a Phone?
Yes. Stabilize the phone, use controlled lighting, and stay within the camera’s focusing range. Avoid heavy digital zoom, and inspect the image closely for sharpening artifacts or lost detail. Dedicated macro equipment offers more control for very small features.
Why Is Only Part of the Jewelry in Focus?
Close-up photography often produces shallow depth of field. Adjust the aperture, change the shooting angle to align more of the piece with the focus plane, or use focus stacking when a stationary item needs to be sharp throughout.
Should You Remove All Reflections From Jewelry Photos?
No. Reflections help show the shape and finish of polished metal. Reduce distracting reflections while retaining controlled highlights and darker edges that make the piece look dimensional.
 >

Black Friday Lifetime Deal: Up to 77% OFF + an extra 10% only for blog readers
Your exclusive code — copy it & use it now